Natural light is one of the most versatile tools in landscape photography. It can shape the atmosphere, define the mood, and completely transform a scene without changing a single piece of gear in your bag. In this guide, you’ll learn how natural light works, how to recognize the best lighting conditions outdoors, and how to use those conditions to create stronger landscape photos. Whether you’re heading out for a sunrise shoot or making the most of an overcast day, this post will give you practical strategies you can use on your next trip to the field.
Understanding Natural Light
What natural light really is
Natural light is any light that comes from the sun, moon, or sky without artificial sources. But it’s not just “light.” It changes in color, direction, and intensity throughout the day. Those changes impact contrast, shadows, texture, and overall mood.
Landscape photographers pay attention to four things:
- Direction – front light, side light, or backlight
- Quality – soft or harsh
- Color – warm or cool
- Consistency – stable or rapidly changing
Understanding these four elements helps you predict how your scene will look and what adjustments you need to make.
How the sun’s angle affects landscapes
The angle of the sun controls shadow length and contrast. Lower angles create long shadows and emphasize texture. Higher angles flatten the scene.
- Low angle light (sunrise, sunset) increases depth.
- Midday high light flattens surfaces and reduces detail.
- Side light brings out ridges, patterns, and layers.
- Backlight creates silhouettes and rim lighting.
Recognizing the sun’s angle gives you creative control instead of guessing your way through a shot.
If you want a deeper dive into how natural light behaves outdoors, Nikon offers a helpful overview in their landscape lighting guide.
The Best Times of Day for Natural Light Landscape Photography
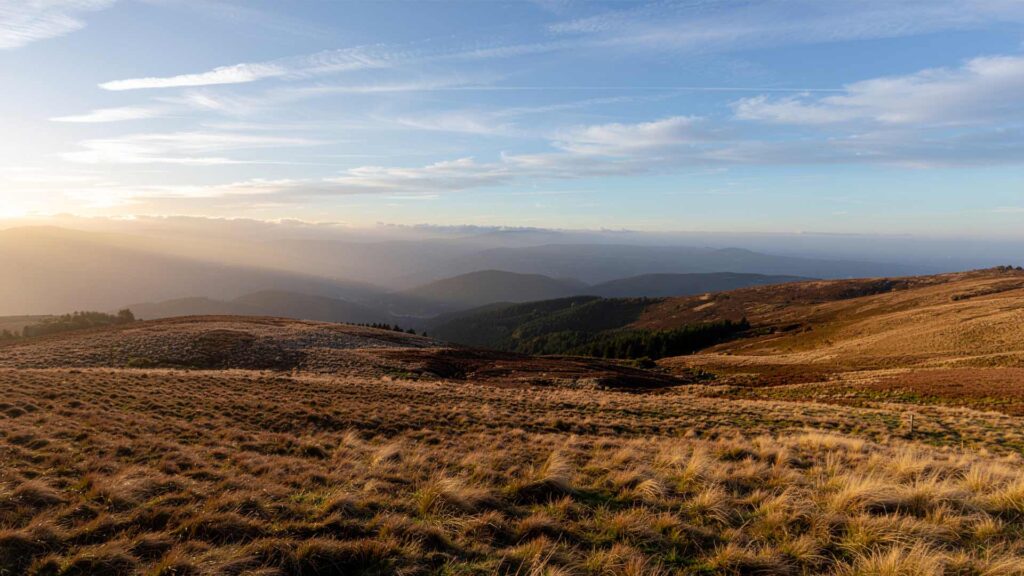
Golden Hour
Golden hour happens shortly after sunrise and just before sunset. The light is warm, soft, and directional. This is when landscapes pop with color and texture.
What makes it ideal:
- Warm tones add drama and depth
- Long shadows emphasize lines and layers
- Lower contrast is easier to expose correctly
This is the classic time most landscape photographers plan their sessions.
Blue Hour
Blue hour happens about 20 to 40 minutes before sunrise or after sunset. The sky becomes a soft gradient of cool blues and purples. It creates a peaceful, quiet mood.
Use blue hour when you want:
- Cool, even lighting
- Simple compositions
- Reflective water scenes
- Silhouettes or city-edge landscapes
Midday Light
Midday gets a bad reputation, but it’s not always unusable. You can make it work when:
- The scene includes bold shapes
- You want strong contrast
- You shoot in forests where overhead light beams create separation
- Clouds soften the sun
If conditions are harsh, aim for:
- Higher shutter speeds
- Lower ISO
- Exposures trimmed down to avoid blown highlights
Overcast or Cloudy Days
Cloud cover turns natural light into a giant softbox. This removes harsh shadows and helps you work with consistent exposure.
Cloudy conditions work well for:
- Waterfalls
- Forest paths
- Foggy lakes
- Macro details within a landscape
If colors look flat, increase contrast and clarity slightly in post.
How to Use Natural Light to Strengthen Your Photos
Watch how the light moves
Light changes fast, especially during sunrise and sunset. Spend the first few minutes watching how it falls across hills, trees, or water. Move your position to match where the light is strongest.
If a ridge brightens before the valley, capture that first. If the sky lights up in one direction, pivot quickly.
Shoot toward and away from the sun
Your scene can look completely different with a small shift in angle.
- Facing the sun: dramatic silhouettes and rim lighting
- Sun at your side: detailed textures, sharp lines
- Sun behind you: even lighting and saturated colors
Try all three before choosing your final composition.
Use shadows to create depth
Shadows are one of the easiest ways to add dimension to flat landscapes. Early and late day shadows:
- Highlight terrain contours
- Reveal ridges and dips
- Add separation between foreground and background
Look for repeating shadows or “leading shadows” to guide the viewer through your image.
Use natural reflectors
Snow, sand, water, light-colored rock, and fog all bounce natural light back into a scene. This reduces contrast and fills dark areas.
Examples:
- Snow softens shadows during sunrise
- Water brightens a dark shoreline
- Fog scatters light for a cinematic look
Pay attention to reflective surfaces whenever you arrive at a new location.
Practical How-To Steps for Beginners
1. Plan your light before you arrive
Apps like PhotoPills, TPE, and SunCalc show you where the sun will rise, fall, and move across your scene. This helps you choose the best shooting direction.
2. Arrive early and stay late
Some of the best light happens 10 minutes before the official golden hour and often continues 10 minutes after it ends. The same goes for blue hour.
3. Lock in exposure using your histogram
Instead of trusting the screen, use the histogram to avoid clipped highlights and shadows. Keep the graph away from either edge for balanced exposure.
4. Adjust white balance for mood
Even though you can correct in post, setting your white balance intentionally helps you visualize your result. Try:
- 5000 to 6000 K for golden hour landscapes
- 3500 to 4500 K for blue hour
- Cloudy or shade preset on overcast days
If you want a deeper explanation of white balance and how color temperature affects your images, you can read my white balance guide for a simple breakdown.
5. Simplify the composition
Good light is only part of the equation. Keep the scene clean:
- Remove distractions
- Use leading lines
- Frame with trees or rocks
- Place strong subjects off-center
Natural light enhances composition. It doesn’t replace it.
6. Use a tripod whenever possible
Natural light is often dim during the best times of day. A tripod helps you keep ISO low and shutter speed controlled. This preserves detail and dynamic range.
7. Bracket difficult exposures
Sunrise and sunset scenes may exceed your camera’s dynamic range. Shooting three exposures at different brightness levels gives you options later.
Common Mistakes to Avoid
Relying only on golden hour
Golden hour is great, but limiting yourself to it reduces opportunities. Beautiful light can happen during fog, storms, overcast skies, and even midday.
Ignoring cloud patterns
The sky can make or break a landscape. Watch for:
- High clouds at sunrise
- Low fog along rivers
- Storm breakups
- Partial cloud cover that diffuses light
Clouds often create the best drama.
Overexposing the sky
The sky should never be pure white unless it’s intentional. Keep highlights in check and pull detail back in editing if needed.
Staying in one spot
Small movements change light dramatically. Walk around, shift angles, adjust height, and test multiple compositions.
Natural light landscape photography is all about learning to read, predict, and use the sun’s behavior to your advantage. When you understand how light direction, color, and quality affect a scene, your photos become more intentional and more compelling. With practice, you’ll start to notice subtle changes in the landscape long before the camera comes out of the bag. If you want to build on this topic, check out the guides on shutter speed techniques and exposure control. These will help you refine your choices even further on your next trip outdoors.
If you want to build on this topic, check out the guides on shutter speed techniques and exposure control.
These will help you refine your choices even further on your next trip outdoors, and the photo editing workflow guide will help you finish strong in post.